
🚀 Erste Schritte
Willkommen! In diesem Kapitel richten wir deinen Account ein und legen die erste Klasse plus das erste Deck an — das dauert etwa 10 Minuten.
Account anlegen
Gehe auf classcards.net/register, wähle „Lehrkraft" und gib deine Schul-E-Mail ein. Du bekommst einen Bestätigungslink.
Klasse anlegen
Im Dashboard → Klassen → Neue Klasse. Name, Schulstufe, Fach. Der Einladungscode wird automatisch generiert.
Schüler:innen einladen
Teile den Einladungscode z. B. per Teams oder Aushang. Schüler:innen öffnen classcards.net, tippen den Code ein und sind sofort drin — ohne E-Mail-Adresse.
Erstes Deck erstellen
Bei der Klasse auf Decks → Neues Deck. Mindestens 20 Karten erstellen oder via CSV importieren. Danach der Klasse zuweisen.
👥 Klassen anlegen
Eine Klasse ist der Rahmen, in dem Schüler:innen + Decks zusammengebracht werden. Du kannst beliebig viele Klassen parallel führen.
Lerngruppen innerhalb einer Klasse
Pro Klasse kannst du Lerngruppen (Fächer) anlegen, z. B. „AHS" und „STD" für differenzierten Unterricht. Jede Lerngruppe hat ihr eigenes Deck und ihren eigenen Fortschritt.
Klasse mit Kolleg:innen teilen
Mehrere Lehrkräfte können dieselbe Klasse gemeinsam verwalten (Collaborators). Jede Kollegin kann in ihrem Lernfortschritt auswählen, welche Decks sie angezeigt bekommt.
🗂️ Decks erstellen

Ein Deck ist eine Sammlung von Karteikarten zu einem Thema. Du kannst Decks von Grund auf neu anlegen oder aus CSVs importieren. Für Sprach-, Geschichte-, Biologie- oder Definitions-Decks geeignet.
Karten anlegen
- Vorderseite: Frage, Begriff oder Bild
- Rückseite: Antwort, Erklärung, Beispielsatz
- Notiz: optional für den Beispielsatz / Kontext
- Tags: z. B. „Lektion 5", „Unregelmäßige Verben"
Mit dem Bold-Button in der Karten-Zeile kannst du einzelne Wörter fett markieren — perfekt zum Hervorheben des wichtigsten Worts in einer Definition oder im Beispielsatz.
🃏 Karten-Typen — für jedes Fach
ClassCards unterstützt sechs Karten-Typen — du kannst sie in einem Deck mischen. Hier sind konkrete Beispiele aus dem Klassenzimmer:
-
📘 Vokabel — Wort + Übersetzung
Englisch:
to afford→sich leisten könnenFranzösisch:la voiture→das Auto -
📗 Klassisch — beliebige Frage + Antwort
Geschichte:
Wann fiel die Berliner Mauer?→9. November 1989Biologie:Was sind die Produkte der Photosynthese?→Glukose und SauerstoffGeographie:Hauptstadt Sloweniens?→Ljubljana -
📙 Lückentext (Cloze) — Text mit verdeckten Wörtern
Geographie:
Die {{Hauptstadt}} Frankreichs ist {{Paris}}.Biologie:Die {{Mitochondrien}} sind die Kraftwerke der Zelle. -
📕 Multiple-Choice — Frage + 4 Antwortmöglichkeiten
Mathematik:
Pythagoras lautet …?· A: a²+b²=c² ✓ · B: a+b=c · C: a²−b²=c · D: c²/a=b -
🖼️ Bild-Karte — Bild auf Vorder- oder Rückseite
Kunst: Foto eines Gemäldes →
Die Mona Lisa, Leonardo da Vinci, ca. 1503Biologie: Bild einer Pflanze →Löwenzahn (Taraxacum officinale) -
🔍 Image-Occlusion — Bild mit verdeckten Bereichen
Anatomie: Skelett mit verdeckten Knochen — Schüler:in benennt einzelnGeographie: Europakarte mit verdeckten HauptstädtenPhysik: Schaltplan mit verdeckten Bauteilen
🎯 Lernmodi


Schüler:innen können auf jeder Karte zwischen drei Modi wechseln:
- Aufdecken (Flashcard): Klassisch — Karte ansehen, drehen, bewerten (Wieder / Schwer / Gut / Einfach).
- Tippmodus: Schüler tippt die Antwort. Smart-Match akzeptiert Schreibvarianten und Synonyme — siehe nächste Sektion.
- Aussprache (TTS): Lautsprecher-Symbol unten rechts in der Karte spielt das Wort in der jeweiligen Sprache (Cloud-Stimme, kein OS-Setup nötig).
ClassCards nutzt FSRS-5 als Spaced-Repetition-Algorithmus — moderner Nachfolger von SM-2, mit besserer Schwierigkeits-Anpassung pro Karte.
🪄 Smart-Match-Korrektur (Tippmodus)

Im Tippmodus akzeptiert ClassCards mehr als nur exakte Schreibweisen — der Korrektur-Mechanismus erkennt:
- Klammer-Inhalte ignoriert:
to kneel (knelt, knelt)→ Schüler:in kann einfach „to kneel" tippen - Slash-Alternativen:
solar power/energy— beide Wörter werden akzeptiert - Abkürzungen:
sb. → somebody/someone,etw. → etwas,jdn. → jemanden - Optionale Platzhalter:
to switch off sth.akzeptiert auch nur „to switch off" - Lehrer-Akzeptanzen werden global gelernt: Wenn du dieselbe Schreibvariante drei Mal akzeptierst, lernt das System diese Regel plattformweit für ähnliche Karten.
- KI-Synonym-Prüfung: Bei unsicheren Fällen (z. B. „turning off" statt „switching off") fragt das System eine KI — du behältst den letzten Stempel.
📥 CSV-Import

Für größere Karten-Listen ist CSV der schnellste Weg. Du findest den Import im Dashboard direkt unter der Schnelleingabe (Button „📋 CSV einfügen").
So funktioniert's
- Decks auswählen (oben in der Quick-Add-Leiste) — die importierten Karten landen in allen aktiven Decks.
- Auf „📋 CSV einfügen" klicken.
- Entweder Datei wählen (
.csv/.tsv/.txt, max. 5 MB) oder Liste direkt in die Textarea einfügen. - Trennzeichen wird automatisch erkannt (Tab, Semikolon, Komma) — bei Bedarf manuell wechseln.
- Spalten zuordnen: welche Spalte ist Vorderseite, welche Rückseite. Die Vorschau zeigt die ersten 5 Zeilen.
- Importieren — fertig. Bei langen Listen wird automatisch in 50er-Batches gespeichert.
Beispiel-Format
Eine Vokabel pro Zeile, zwei Spalten — Trennzeichen ist egal (Tab funktioniert auch direkt aus Excel via Copy-Paste):
oil spill Ölpestto investigate untersuchencrucial entscheidend
Aus Excel: einfach den Bereich markieren, kopieren (Strg+C), in die Textarea einfügen (Strg+V) — Excel kopiert die Spalten Tab-getrennt.
Umlaute / Sonderzeichen: Falls eine Excel-Datei merkwürdige Zeichen statt Umlauten anzeigt, erkennt ClassCards das automatisch und probiert das Windows-Encoding (Codepage 1252).
Alternativ: KI-Vorschlag generiert Karten automatisch aus eingefügtem Volltext oder Wortlisten.
📩 Schüler einladen
Am schnellsten mit dem Einladungscode pro Klasse. Alternative: Du legst die Accounts selbst an (Bulk-Import) und verteilst die Passwörter.
🔄 Wie FSRS deine Karten plant
ClassCards nutzt den FSRS-5-Algorithmus (Free Spaced Repetition Scheduler) — den modernsten Spaced-Repetition-Algorithmus. Statt fixer Intervalle berechnet er für jede Karte und jede:n Schüler:in individuell, wann die nächste Wiederholung sinnvoll ist.
Die Animation zeigt fünf typische Lern-Verläufe quer durch die Fächer:
So plant FSRS deine Wiederholungen
Je nach Antwort-Qualität (Wieder / Schwierig / Gut / Einfach) wachsen die Intervalle unterschiedlich schnell. „Wieder" auf einer Review-Karte schickt sie zurück in den Relearning-Modus — der Algorithmus bemerkt das Vergessen und korrigiert.
📊 Lernfortschritt lesen
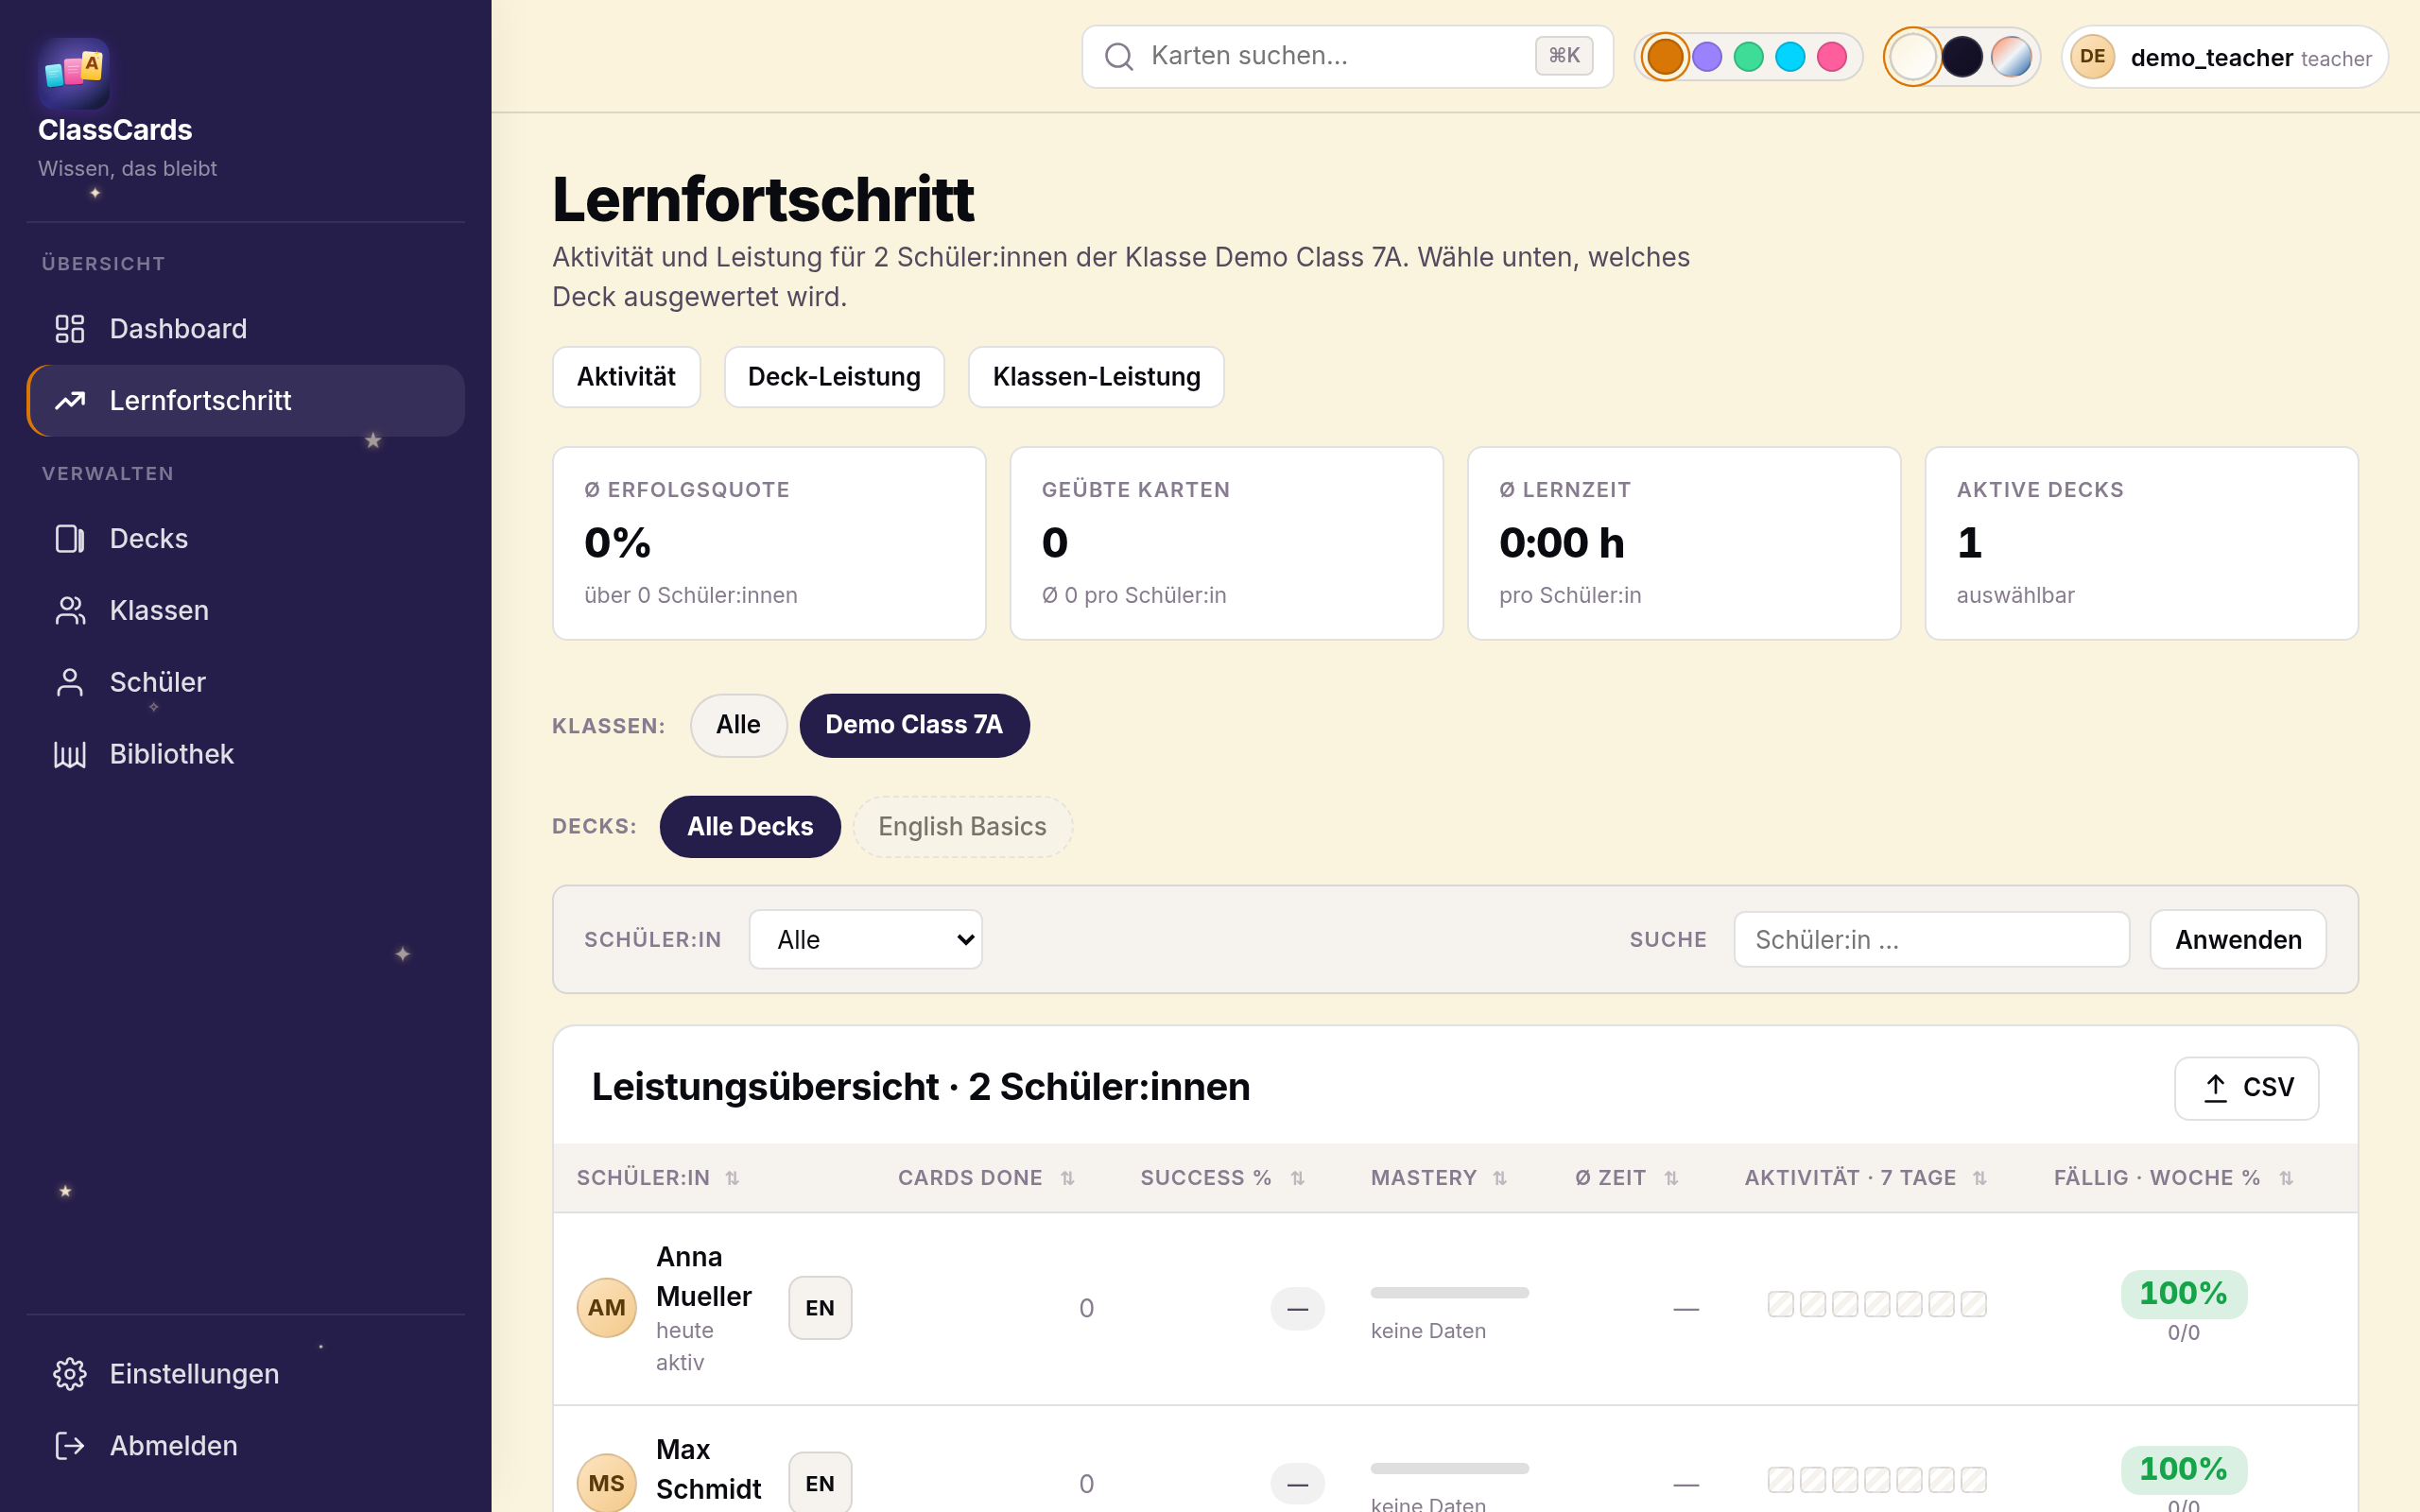
Im Lernfortschritt-Dashboard siehst du: wer ist aktiv, wer hinkt hinterher, welche Karten sind „schwach" (fehleranfällig), wie viel wurde heute/diese Woche geübt.
Heatmap pro Schüler:in
Für jede:n Schüler:in zeigen wir einen 7-Tage-Streifen mit Farbcodierung:
- 🟩 Sattgrün (≥95%): hervorragend gelernt
- 🟢 Hellgrün (80–94%): gut gelernt
- 🟡 Gelb (50–79%): wackelig — Wiederholung empfohlen
- 🟥 Rot (<50%): Nachholbedarf
- ▦ Schraffur: nichts war fällig — Schüler:in hatte „frei"
- 🟥 Rot (säumig): war fällig, aber nichts geübt
Wochenbilanz
Die „Fällig·Woche %"-Spalte zeigt, wie viele der diese Woche fälligen Karten tatsächlich erledigt wurden — gecapt auf 100% (zusätzliche Übung im Zufallsmodus zählt nicht doppelt).
Was ist „schwach"?
Eine Karte gilt als schwach, wenn mindestens 30 % der Antworten falsch waren. Diese Karten solltest du im Unterricht gezielt aufgreifen.
🔗 ClassCheck-Notenraster
ClassCheck ist ein digitales Notenraster. Über die Integration übernimmst du den Lernfortschritt deiner Klassen als Mitarbeitsnote (Prozent-Spalte) ins Notenraster — ganz ohne Abtippen.
Einmalig: Verbindung herstellen
Token in ClassCards erzeugen
In ClassCards → Einstellungen → ClassCheck-Integration → „Neuen Token erzeugen". Den angezeigten Token kopieren (er wird nur einmal angezeigt). Der Token erlaubt ausschließlich Lesezugriff auf Schülerlisten und Lernfortschritt und ist jederzeit widerrufbar.
Token in ClassCheck einfügen
In ClassCheck → Einstellungen → „ClassCards verbinden" → Token einfügen und „Verbinden & testen". Fertig — diese Verbindung bleibt bestehen.
Bei jedem Import
In ClassCheck importieren
In ClassCheck ein Fach öffnen → in der Werkzeugleiste „📥 ClassCards-Import". Dann ClassCards-Klasse und Zeitraum wählen (Schnellauswahl wie „Letzte 7 Tage" oder Kalender) → „Laden".
Zuordnen & eintragen
Die Schüler:innen werden automatisch per Namensabgleich zugeordnet — kurz prüfen, ggf. korrigieren — und mit „Importieren" als neue Spalte „ClassCards-Lernfortschritt" (Prozentwert) eingetragen. Die Zuordnung wird gemerkt, beim nächsten Mal geht es schneller.
Status-Icon im Lernfortschritt
Im ClassCards-Lernfortschritt erscheint über den Tageswerten eine kleine Status-Reihe (✓ = dieser Tag wurde bereits nach ClassCheck importiert). So siehst du auf einen Blick, was schon übertragen ist — pro Tag, für die ganze Klasse.
Die Integration funktioniert für Klassen, die du selbst besitzt und für geteilte Klassen (als Mitarbeiter:in), sowohl für verschlüsselte (E2EE) als auch normale Fächer in ClassCheck.
📶 Offline-Modus
Die Schüler-App (PWA) cached die aktuelle Lernsession. Auch ohne Netz können Karten beantwortet werden — die Antworten werden beim nächsten Online-Kontakt synchronisiert.
🔒 Datenschutz für Schulen
Wir bieten Schulen einen vorgefertigten Auftragsverarbeitungsvertrag (AVV). Daten werden ausschließlich in der EU (Deutschland, Hetzner) gespeichert. Keine Übermittlung in die USA, kein Tracking durch Dritte.